
The Embedded Payment Page (EPP) lets you host Orbital’s checkout directly inside your website or application. Both EPP and HPP use the same underlying checkout flow. The difference is how customers access it:
- HPP (Hosted Payment Page): Customers are redirected to an Orbital-hosted URL.
- EPP (Embedded Payment Page): The same page is loaded in an iframe inside your site.
| Feature | HPP | EPP |
|---|---|---|
| Redirect required | ✅ Yes | ❌ No |
| Checkout hosted by Orbital | ✅ | ✅ |
| Runs inside your site/app | ❌ | ✅ |
What is Orbital Widget ?
The Orbital Widget is a lightweight JavaScript library that embeds an external Orbital page within an iframe on your application. This removes the need for redirects and keeps the entire flow inside your application.
Below is the flow on how integrate the Orbital Widget for your application.
Step 1: Install the Orbital Widget package
First, you need to add the widget to your project. You can either install it as a package or include it via a CDN script tag.
A) Install with npm/yarn
Open your project's terminal and run one of the following commands:
npm install @payperform/widgetyarn add @payperform/widgetB) Install with CDN
Alternatively, you can include the widget via a CDN script tag in your HTML file:
<script src="https://widgets.getorbital.io/index-latest.js"></script><script src="https://widgets.getorbital.io/index-{version}.js"></script>Quick Links
Step 2: Generate an EPP signature
To initialize the Embedded Payment Page (EPP), the Orbital Widget requires a signature. This EPP signature is a secure token that defines your payment session, including details like amount, currency, customer information, and callback URLs. The signature ensures that payment requests are authenticated and haven't been tampered with. There are two ways to obtain this signature:
Method 1: Manual API Call
For testing and development purposes, you can create a temporary EPP signature by directly calling the EPP Signature API endpoint .This method allows you to quickly test the widget integration without setting up a backend serve
This method is for sandbox testing only. The generated signature will expire quickly and should not be used in production environments
Method 2: Backend server(production):
In production, the EPP signature must be created by your backend server using the Orbital API key. This ensures that:
- Your API key is never exposed in frontend code.
- Each session uses a fresh, valid signature.
Backend Implementation Example
This example demonstrates how to create a simple Node.js/Express server that generates EPP signatures. This is a basic implementation, you should customize it based on your specific requirements
First, install dependencies:
npm install express axios cors dotenvCreate a .env file in the project root and set up the necessary environment variables:
API_URL=https://hpp.getorbital.io/invoice/widgets

API_KEY=your_api_key_here
Then create a file server.js. This calls the https://hpp.getorbital.io/invoice/widgets endpoint with your credentials and orbital returns a signature which will be used by your frontend to initialize the widget.
require('dotenv').config()
const express = require('express')
const axios = require('axios')
const cors = require('cors')

const app = express()
// Enable CORS for all origins
app.use(cors())
app.use(express.json())

app.post('/generate-signature', async (req, res) => {
  try {
    const response = await axios.post(
      process.env.API_URL || 'https://hpp.getorbital.io/invoice/widgets', // Use API URL from .env
      req.body,
      {
        headers: {
          'Content-Type': 'application/json',
          'x-api-key': process.env.API_KEY, // Use API key from .env
        },
      }
    )

    res.status(200).json(response.data)
  } catch (error) {
    res.status(500).json({
      message: 'Error sending request',
      error: error.response ? error.response.data : error.message,
    })
  }
})

const PORT = process.env.PORT || 3000
app.listen(PORT, () => {
  console.log(`Server is running on port ${PORT}`)
})
Start the server:
node server.jsYour frontend can now call POST /generate-signature to fetch a fresh signatures for each payment section.
This server implementation is not part of the Orbital Widget library, but it provides a necessary backend for users to fetch the required signature.
Step 3: Initialize the Widget
Once you have your signature (from either method above), the next step is to integrate the Orbital Widget into your frontend application.
Example 1: Vanilla.Js (No Backend)
This Vanilla.js implementation example is is ideal for quick testing of the payment flow without setting up a full backend. You'll need to call the GET EPP Signature API endpoint , copy the returned signature, and replace const signature = 'YOUR-SIGNATURE-HERE' with your signature.
<!doctype html>
<html lang="en">
 <head>
   <meta charset="UTF-8" />
   <meta name="viewport" content="width=device-width, initial-scale=1.0" />
   <meta http-equiv="Content-Security-Policy" content="frame-src 'self' https://hpp.getorbital.io/" />
   <title>Orbital Widget Example</title>
   <style>
     // Give the container a clear height
     #orbital {
       width: 100%;
       max-width: 480px; /* optional, so it doesn’t stretch too wide */
       height: 400px;    /* adjust as needed */
       margin: 40px auto;
       border: 0;
     }
   </style>
 </head>
 <body>
   <div id="orbital"></div>
   <script src="https://widgets.getorbital.io/index-latest.js"></script>
   <script>
     window.addEventListener('load', async () => {
       // Simulate fetching the signature from your backend
       const signature = 'YOUR-SIGNATURE-HERE' // Replace with your own logic to get the signature

       const orbitalElement = document.getElementById('orbital')
       if (orbitalElement && signature) {
         orbitalElement.setAttribute('signature', signature)
       }

       if (typeof OrbitalWidget !== 'undefined' && typeof OrbitalWidget.init === 'function') {
         OrbitalWidget.init({
           container: 'orbital',
         })
       } else {
         console.error('OrbitalWidget was not loaded properly.')
       }
     })
   </script>
 </body>
</html>
Once integrated, the widget will automatically embed Orbital's payment page within the provided container on your site.
Example 1: React.js (No Backend)
This React implementation example is ideal for basic widget functionality in React applications. You'll need to call the GET EPP Signature API endpoint to get a signature and replace setSignature('YOUR_SIGNATURE_HERE') with your signature.
import React, { useEffect, useState, useRef } from 'react'
import { init } from '@payperform/widget'
import styles from './OrbitalWidget.module.scss'

const OrbitalWidget: React.FC = () => {
  const [signature, setSignature] = useState<string | null>(null)
  const orbitalRef = useRef<HTMLDivElement | null>(null)

  useEffect(() => {
    // Call the EPP Signature API endpoint to get a fresh signature
    // Replace this placeholder with your actual signature
    setSignature('YOUR_SIGNATURE_HERE')
  }, [])

  useEffect(() => {
    if (signature && orbitalRef.current) {
      orbitalRef.current.setAttribute('signature', signature)

      init({
        container: orbitalRef.current,
      })
    }
  }, [signature])

  return (
    <div
      className={styles['iframe-container']}
      id="orbital"
      ref={orbitalRef}
      style={{
        height: '350px',
        minHeight: '400px',
        width: '100%'
      }}
    />
  )
}

export default OrbitalWidget
Once integrated, the widget will automatically embed Orbital's payment page within the provided container on your site.
Example 3: React.js- Fetch Signature from Backend
In the React snippet, the widget calls the backend’s /generate-signature endpoint, receives the signature in response, and then passes it into the widget. This flow is secure cause only the backend server can create the valid signatures.
import React, { useEffect, useRef, useState } from 'react'
import { init, InitOptions } from '@payperform/widget'
import 'tailwindcss/tailwind.css'


const PaymentPage: React.FC = () => {
 const orbitalRef = useRef<HTMLDivElement | null>(null)
 const [signature, setSignature] = useState<string | null>(null)
 const [error, setError] = useState<string | null>(null)
 const [selectedTab, setSelectedTab] = useState<InitOptions['mode']>('iframe-only')


 useEffect(() => {
   const getSignature = async () => {
     try {
       // calls the backend
       const res = await fetch('http://localhost:3001/generate-signature', {
         method: 'POST',
         headers: { 'Content-Type': 'application/json' },
         body: JSON.stringify({}),
       })

       const data = await res.json()
       if (!data.signature) throw new Error('No signature returned')
       setSignature(data.signature)
     } catch (err: any) {
       setError(err.message || 'Failed to get signature')
     }
   }

   getSignature()
 }, [])


 // Initialize Orbital widget when signature is ready
 useEffect(() => {
   if (!signature || !orbitalRef.current) return


   orbitalRef.current.innerHTML = ''
   orbitalRef.current.setAttribute('signature', signature)


   init({
     container: orbitalRef.current,
     mode: selectedTab,
   })
 }, [signature, selectedTab])


 return (
   <div className="p-6">
     {error && <p className="text-red-600">{error}</p>}


     <div className="mb-4 flex gap-2">
       <button
         onClick={() => setSelectedTab('small-widgets')}
         className={`px-4 py-2 rounded ${selectedTab === 'small-widgets' ? 'bg-blue-500 text-white' : 'bg-gray-200'}`}
       >
         Small Widgets
       </button>
       <button
         onClick={() => setSelectedTab('iframe-only')}
         className={`px-4 py-2 rounded ${selectedTab === 'iframe-only' ? 'bg-blue-500 text-white' : 'bg-gray-200'}`}
       >
         Iframe Only
       </button>
     </div>


     <div
       id="orbital"
       ref={orbitalRef}
       className="w-full border border-gray-300 rounded-lg bg-white"
       style={{
         height: selectedTab === 'iframe-only' ? '75vh' : '480px',
         minHeight: selectedTab === 'iframe-only' ? '75vh' : '480px',
       }}
     />
   </div>
 )
}


export default PaymentPage
Once integrated, the widget will automatically embed Orbital's payment page within the provided container on your site.
For full implementation and a working example on how to fetching the signature from a backend, please refer to the examples/react folder in this repository.
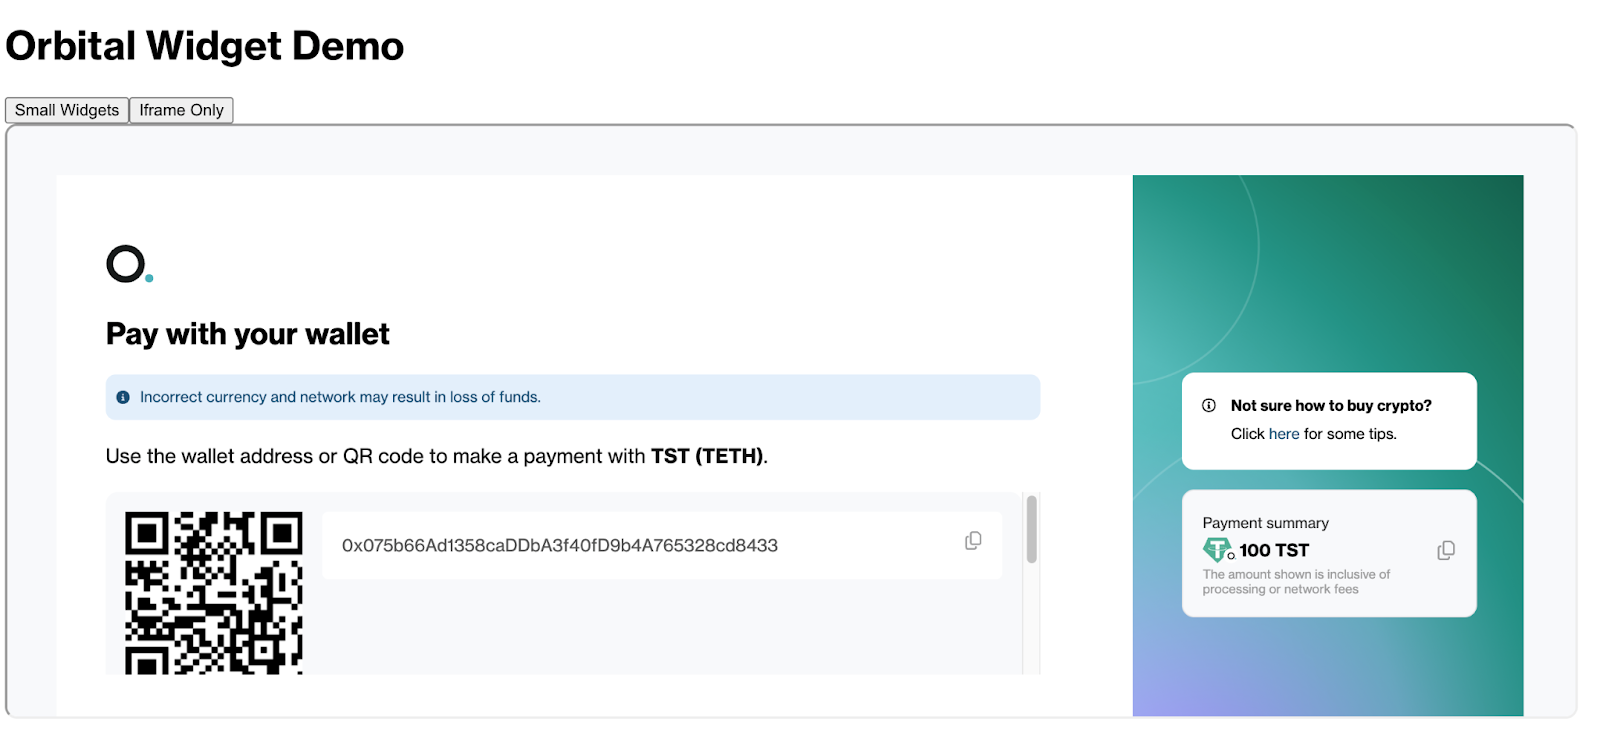
Below is an example of the Orbital EPP page
(Optional) Customize with EPP Payment Page
The init() method supports several options you can use to match the widget to your site’s design and user flow
| Property | Type | Description |
|---|---|---|
container | string /string[] /HTMLElement / HTMLElement[] | The container(s) where the widget will be initialized. Can be a single string, an array of strings, or a single HTMLElement or an array of HTMLElements. |
mode | 'iframe-only' /'small-widgets' | Defines the mode for the widget. If not provided, defaults to 'iframe-only'. |
button.color | 'white-black' /'black-white' /'red-white' /'red-black' / 'blue-white' | Button color schemes. |
button.logoOnly | boolean | If true, will use the text-based logo. |
button.width | string | The width of the button (CSS units). Added to the style tag. |
button.height | string | The height of the button (CSS units). Added to the style tag. |
See the Widget Reference for the full list of properties and advanced customization options.
Security Consideration
Below are the implementing an embedded payment page:
- To allow your page to embed the Orbital iframe, you must add a Content-Security-Policy (CSP) meta tag to the head of your HTML file. This policy tells the browser that your site trusts and is permitted to load content from Orbital.
<meta http-equiv="Content-Security-Policy" content="frame-src 'self' [https://hpp.getorbital.io](https://hpp.getorbital.io)">If you use other iframes aside from our package, ensure that it is also added to the content lists of allowed domains.
- Always use HTTPS to encrypt data in transit.
- Implement proper Content Security Policy (CSP) headers.
- Regularly update the Orbital Widget to the latest version.
- Never store sensitive payment information on your servers.
- Implement proper error handling to avoid exposing sensitive information.