
How to Send a Mass Payout
A Mass Payout enables you to make payouts to multiple beneficiaries in one convenient place, rather than having to create multiple manual payouts.
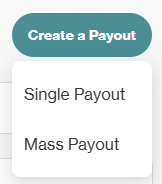
Initiating a Mass Payout
- From the left-hand navigation menu, go to eCommerce → Pay Outs.
- Click Create Payout → Mass Payout.
- Select the funding account/PMID and click next.
- Note: Auto-conversion is only available for fiat PMIDs. If using a crypto PMID, all payouts must match the PMID’s currency (and network for USDT/USDC).

- Download the CSV template specific to your selected PMID. Headers must remain unchanged or the file will be rejected.
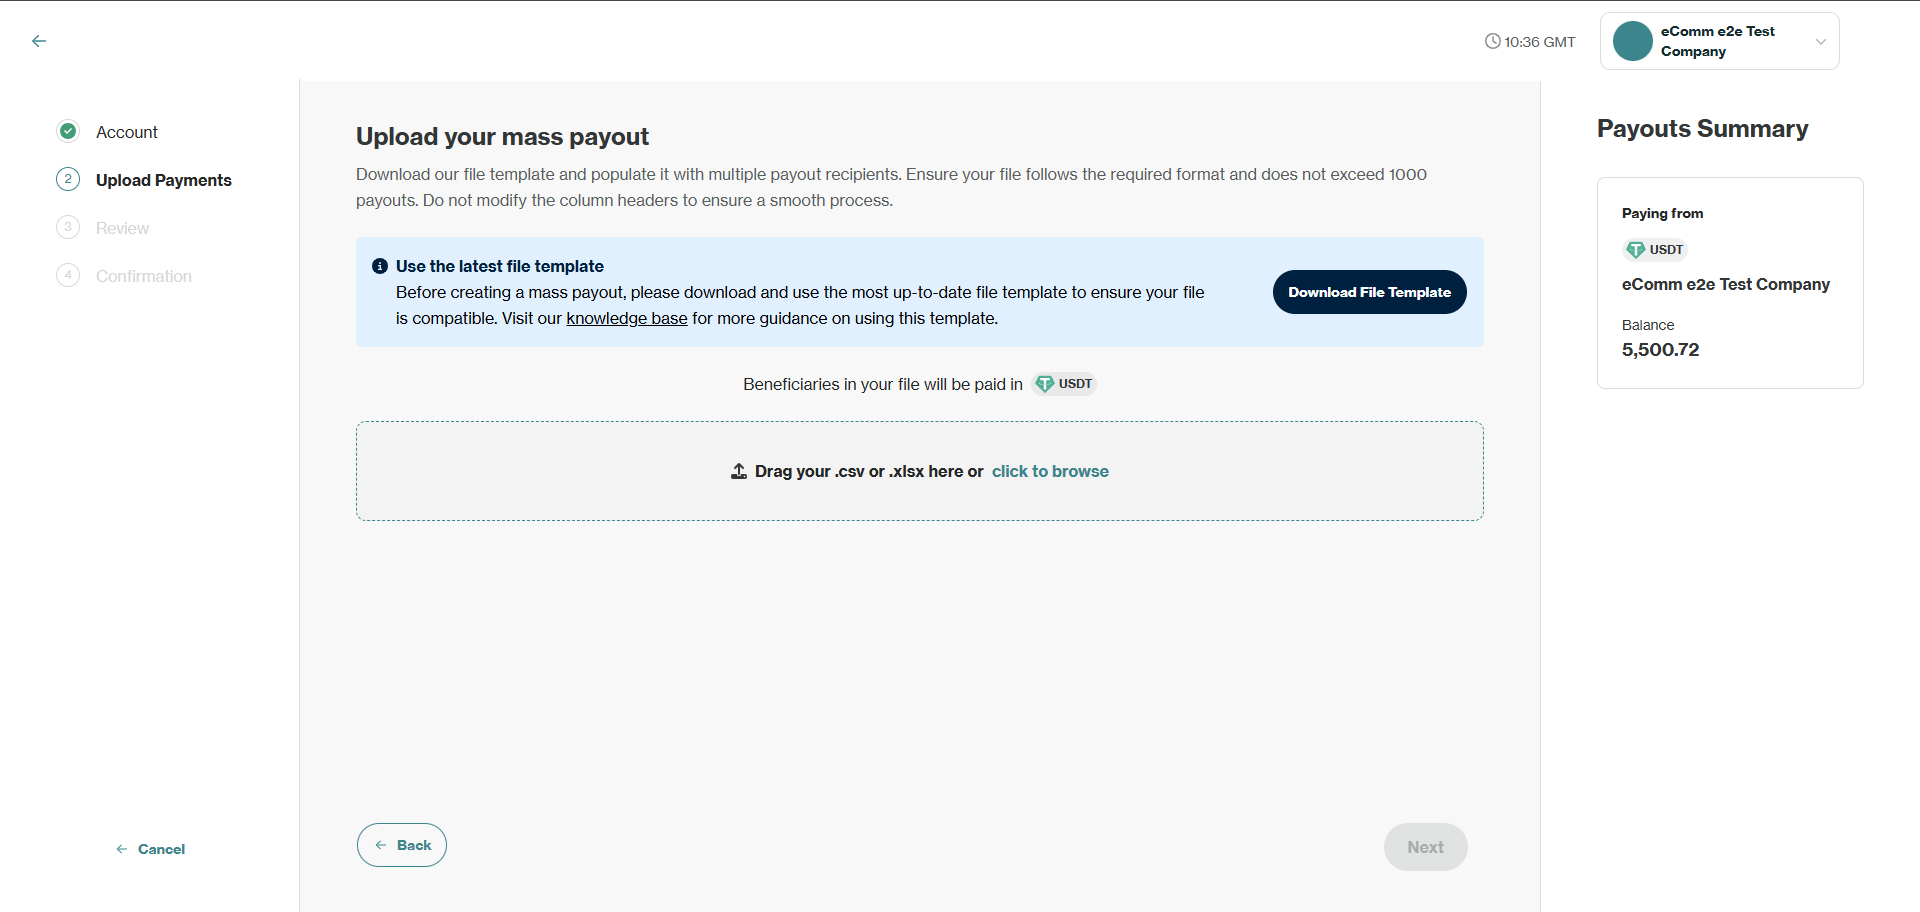
- Open the template in your chosen software and fill out the template according to the guidance in filling your template.

An example of 3 valid payouts in the Crypto PPOU PMID template

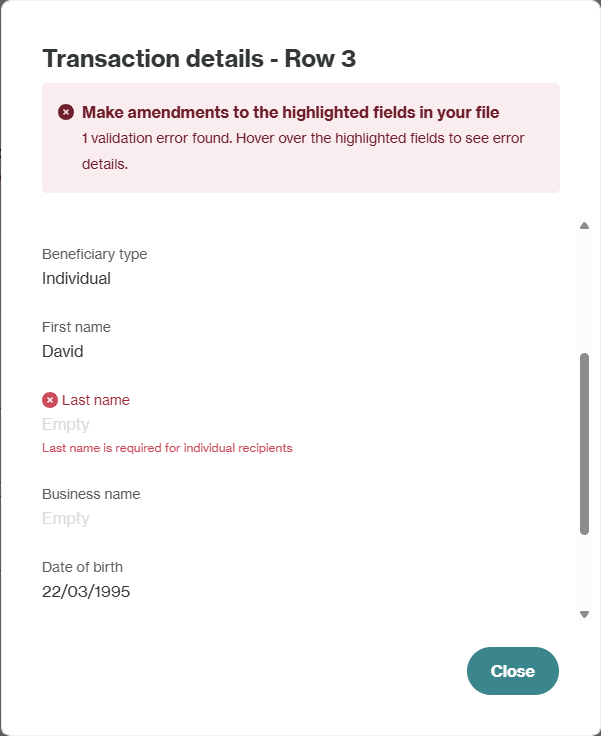
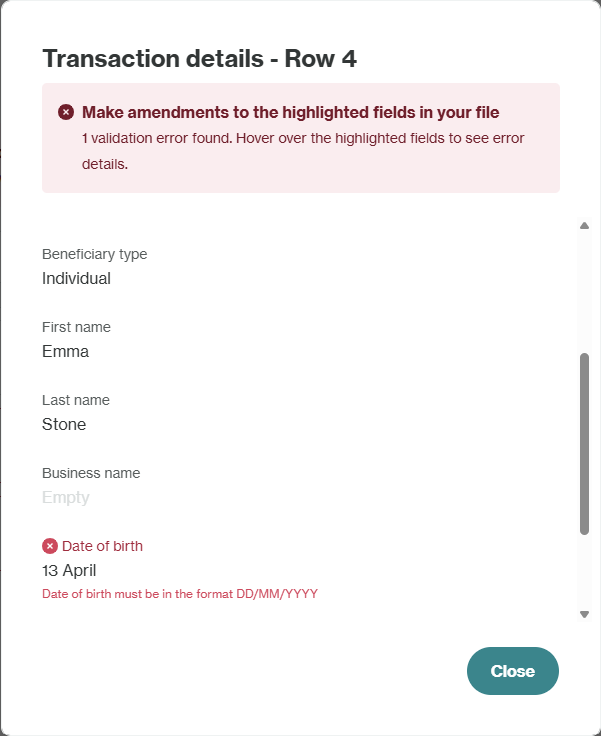
An example of invalid payouts in the Crypto PPOU PMID template (Row 3 - Missing IndividualLastName, Row 4 - Invalid DateOfBirth)
- Save as .csv or .xlsx and upload to the Client Portal.

- Any critical errors will appear at this point:
- Invalid Balance: Insufficient account balance. Delete payouts from your file and reupload to reduce the total or select an account with more funds.
- Too Many Payouts: Maximum 1,000 payouts per file. Split your data into multiple files if needed.
- Invalid Input in Amount Field: Use only alphanumeric characters and separators ( . , ). Remove symbols like currency signs ($).
- Click next to proceed to the review screen.
- Click individual payments to inspect specific errors. Correct your file and reupload if necessary.

The uploaded file has errors in Row 3 and Row 4
- To fix the error, you will need to edit your file accordingly and reupload it on the upload page. For more guidance, refer to filling your template.
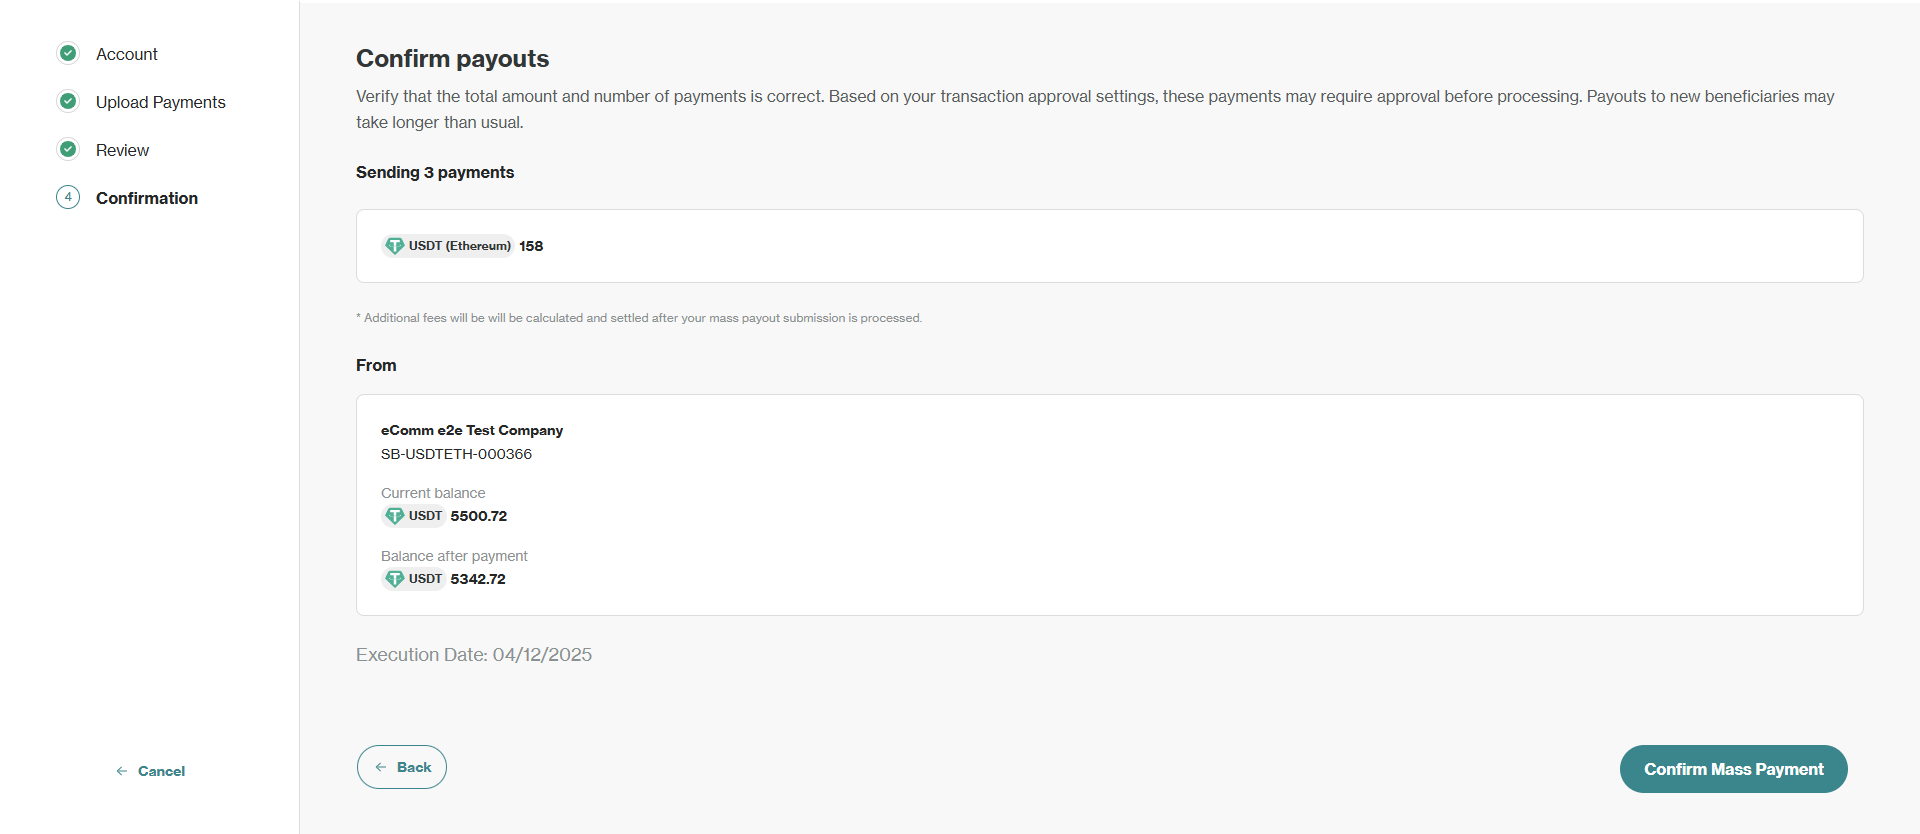
- Once error-free, click next to proceed to the confirmation page - review the total amount and any applicable fees.
- Click Confirm Mass Payout.
Viewing a Mass Payout
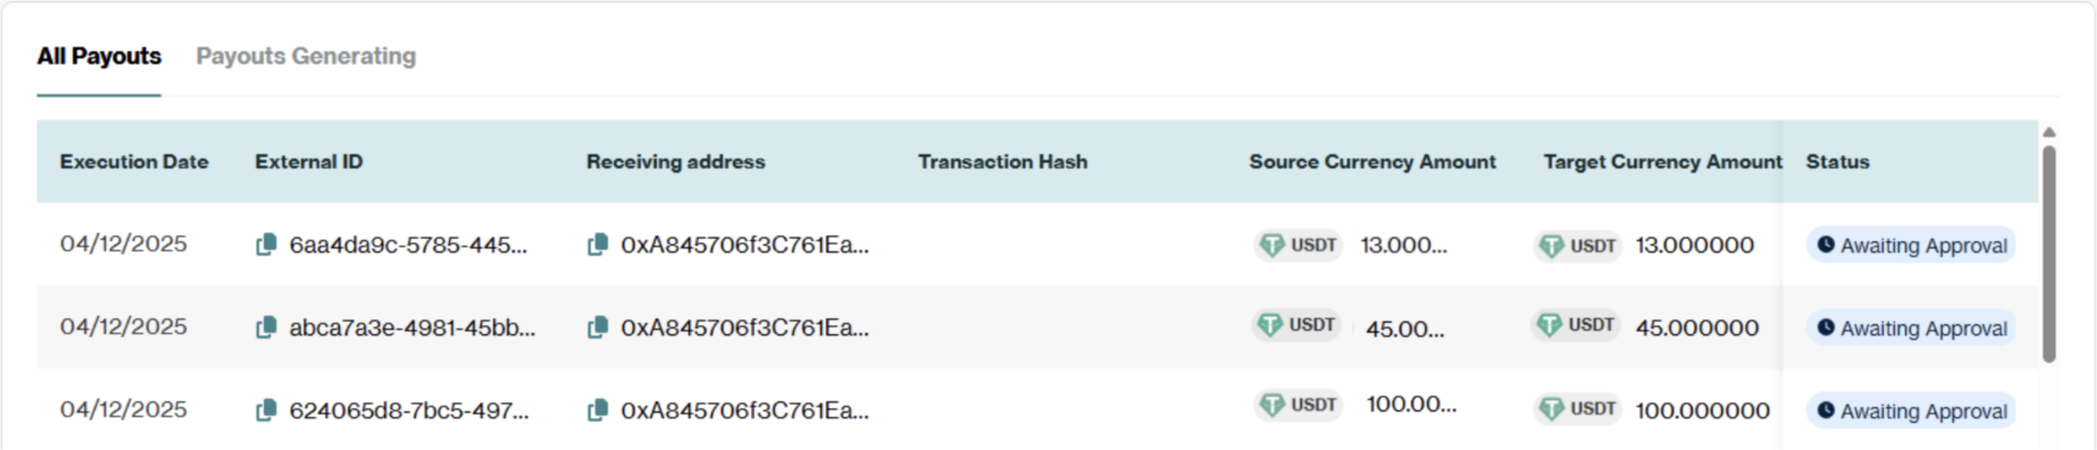
Once a Mass Payout has been submitted, the individual payouts proceed to eCommerce → Pay Outs → Payments Generating tab. Payouts in this table are being requested in the Orbital system, and once they have been successfully created they move to the eCommerce → Pay Outs → All Payouts tab, where they will follow the process of a regular payout (including the regular statuses).
If you click onto a payout, you will find its BatchID, which identifies the Mass Payout it is a part of. You can use this BatchID to search for all payments from that batch.
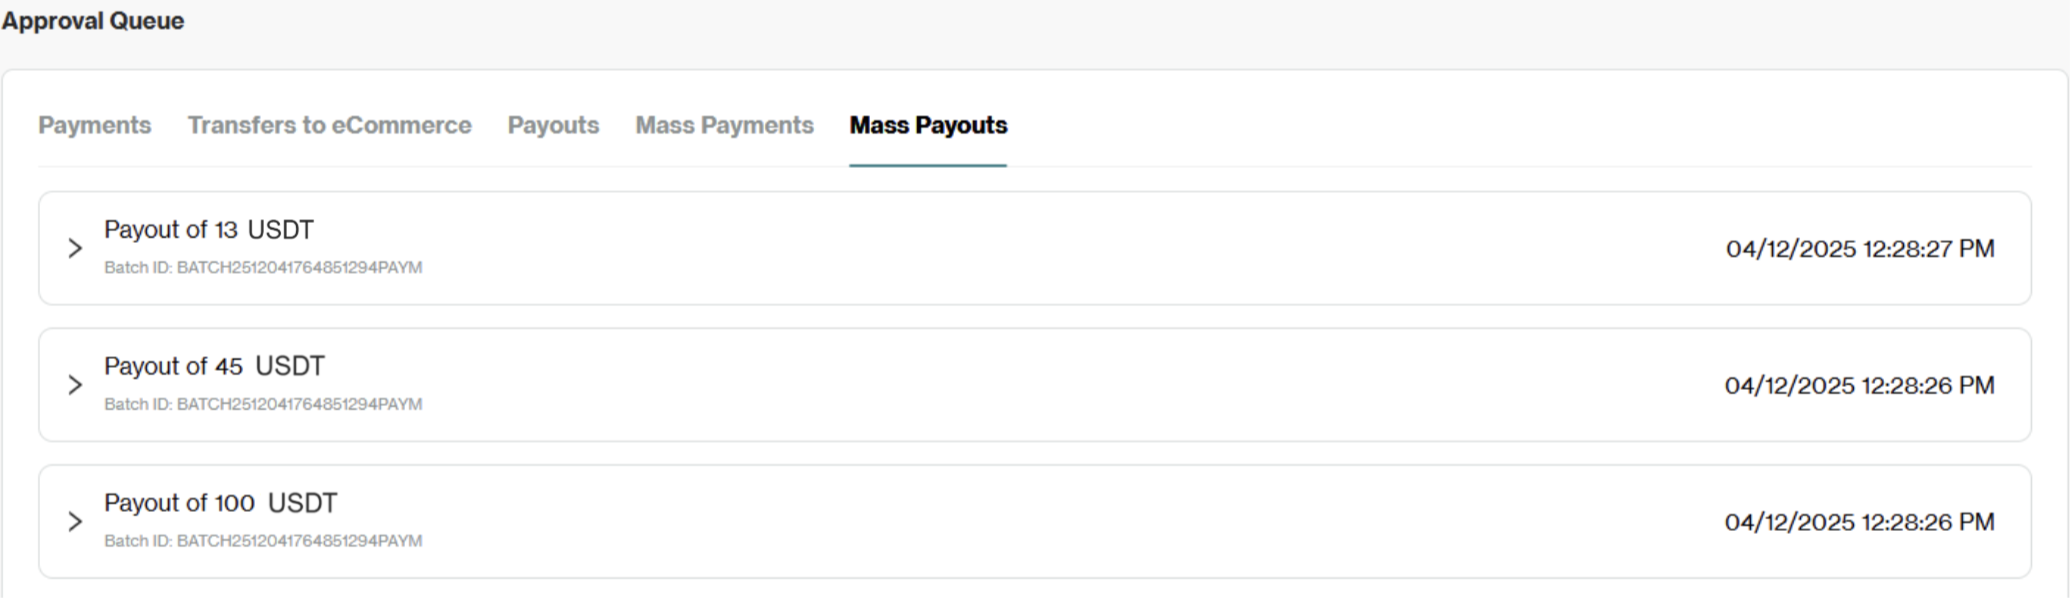
Approving a Mass Payout
If you have approval rules enabled for eCommerce payouts, an eCommerce Mass Payout will join the approval queue. There are two options for how to approve a Mass Payout:
- Batch Approval Mode: A Mass Payout will appear as a single ‘batch’ in the approval queue and you will approve the entire batch as a single action.
- Individual Approval Mode: Each individual payout within the Mass Payout will appear in the approval queue. You will approve/reject each individual payout separately.
If you do not have approval rules enabled for eCommerce payouts, any Mass Payout will not be held for approval and will proceed like a regular eCommerce payout.
Selecting your Approval Mode
- Navigate to Approval Queue → Mass Payouts tab.
- Select ‘Choose Approval Mode’ button and toggle Batch Approval Mode on/off.

Note: You will not be able to change the Approval Mode while there are payouts pending in the Approval Queue - ensure you have selected the correct Approval Mode for your business before you make any Mass Payouts.
Approving a Mass Payout using Batch Approval Mode
A Mass Payout will appear in the Approval Queue under the Mass Payouts tab. Review the total amount instructed, creator of the Mass Payout, individual transactions, and Batch ID. If you approve the Mass Payout, all individual payouts within the batch will proceed to processing. Due to the instantaneous nature of crypto payouts, it is virtually impossible to stop or cancel a transaction once the process has started. Please verify carefully before approving.

Approving a Mass Payout using Individual Approval Mode
All individual payouts from the Mass Payout will appear in the Approval Queue under the Mass Payouts tab. Follow the regular approval process to approve or reject each payout from the Mass Payout.
Reporting
Individual payouts from a Mass Payout are visible in your reports (see the Reporting section for instructions on how to generate an eCommerce report). Look for the dedicated BatchID field. You can use this unique ID to filter and reconcile all payments associated with a specific Mass Payout, including each individual payout’s status.
Filling your template
Ensure you download a new Mass Payout template every time you initiate a Mass Payout, as the precise data required is dependent on the PMID/account used to fund the transaction.
Refer to the below guidance on the formatting and requirements of the fields for either a crypto PMID or fiat PMID template, but if in doubt, check your template to see which fields are present.
Fiat PMID Template
For Fiat PMIDs, auto-conversion is undertaken. You can input multiple payout currencies into your file and Orbital will handle the conversion into the chosen currency for each beneficiary. Note that the inputted amount will be in your Source Currency (the fiat currency).
| Field | Description | Required Format |
|---|---|---|
| Amount | The amount to be sent to the beneficiary's account (in the source Currency i.e. the fiat currency) | Mandatory Numeric characters and separators ( . , ) only |
| Description | Custom text to describe the payment | Optional Alpha-numeric characters only: letters (A-Z, a-z), digits (0-9), and spaces are permitted |
| Currency | The currency to be sent to the beneficiary's account | Mandatory Must be an allowed payout currency: USDT, USDC, ETH, BTC, LTC, BCH |
| Network | For USDT/USDC, the blockchain/network of the currency to be sent to the beneficiary's account | Conditional: Mandatory if Currency is USDT or USDC For USDT: TRX, ETH, MATIC, TON, BNB For USDC: SOL, ETH, MATIC, TRX, BNB |
| BeneficiaryType | The type of beneficiary (business or individual) | Mandatory A single character indicating the entity type - ‘B'/’b' (Business) or ‘I'/’i' (individual) only |
| BusinessRegisteredName | The registered name for a business beneficiary | Conditional: Mandatory if BeneficiaryType is B/b (Business) May only contain letters, numbers, spaces, and the following symbols: . / \ - ? : ( ) , + |
| IndividualFirstName | The first name for a beneficiary that is an individual | Conditional: Mandatory if BeneficiaryType is I/i (Individual) May only contain letters, numbers, spaces, and the following symbols: . / \ - ? : ( ) , + |
| IndividualLastName | The last name for a beneficiary that is an individual | Conditional: Mandatory if BeneficiaryType is I/i (Individual) May only contain letters, numbers, spaces, and the following symbols: . / \ - ? : ( ) , + |
| WalletAddress | The beneficiary’s wallet address | Mandatory May only contain letters, numbers, colons ( : ), and dashes ( - ) |
| CompanyRegistrationNumber | The company registration number for a business beneficiary | Conditional: Inclusion of this field is PMID-dependent. If present in your template, it is Mandatory when the BeneficiaryType is set to 'B' (Business). May only contain letters and numbers, with no symbols or line breaks. |
| DateOfBirth | The date of birth for a beneficiary that is an individual | Conditional: Mandatory if BeneficiaryType is I/i (Individual) Must be inputted in the format of DD/MM/YYYY |
Crypto PMID Template
For Fiat PMIDs, auto-conversion is undertaken. You can input multiple payout currencies into your file and Orbital will handle the conversion into the chosen currency for each beneficiary.
| Field | Description | Required Format |
|---|---|---|
| Amount | The amount to be sent to the beneficiary's account (in the given Currency) | Mandatory Numeric characters and separators ( . , ) only |
| Description | Custom text to describe the payment | Optional Alpha-numeric characters only: letters (A-Z, a-z), digits (0-9), and spaces are permitted |
| Currency | The currency to be sent to the beneficiary's account | Mandatory Must match the currency of the PMID you selected to fund the Mass Payout: USDT, USDC, ETH, BTC, LTC, BCH |
| Network | For USDT/USDC, the blockchain/network of the currency to be sent to the beneficiary's account | Conditional: Mandatory if Currency is USDT or USDC Must match the network of the PMID you selected to fund the Mass Payout For USDT: TRX, ETH, MATIC, TON, BNB For USDC: SOL, ETH, MATIC, TRX, BNB |
| BeneficiaryType | The type of beneficiary (business or individual) | Mandatory A single character indicating the entity type - ‘B'/’b' (Business) or ‘I'/’i' (individual) only |
| BusinessRegisteredName | The registered name for a business beneficiary | Conditional: Mandatory if BeneficiaryType is B/b (Business) May only contain letters, numbers, spaces, and the following symbols: . / \ - ? : ( ) , + |
| IndividualFirstName | The first name for a beneficiary that is an individual | Conditional: Mandatory if BeneficiaryType is I/i (Individual) May only contain letters, numbers, spaces, and the following symbols: . / \ - ? : ( ) , + |
| IndividualLastName | The last name for a beneficiary that is an individual | Conditional: Mandatory if BeneficiaryType is I/i (Individual) May only contain letters, numbers, spaces, and the following symbols: . / \ - ? : ( ) , + |
| WalletAddress | The beneficiary’s wallet address | Mandatory May only contain letters, numbers, colons ( : ), and dashes ( - ) |
| CompanyRegistrationNumber | The company registration number for a business beneficiary | Conditional: Inclusion of this field is PMID-dependent. If present in your template, it is Mandatory when the BeneficiaryType is set to 'B' (Business). May only contain letters and numbers, with no symbols or line breaks. |
| DateOfBirth | The date of birth for a beneficiary that is an individual | Conditional: Mandatory if BeneficiaryType is I/i (Individual) Must be inputted in the format of DD/MM/YYYY |
Binance Pay Template
For Binance Pay PMIDs, payouts can be in either USDT or USDC. You will need to provide either the BinanceID or BinanceEmailAddress associated with your beneficiary for a successful payout. If both are provided, the BinanceID will be used to make the payout.
| Field | Description | Required Format |
|---|---|---|
| Amount | The amount to be sent to the beneficiary's account (in the given Currency) | Mandatory Numeric characters and separators ( . , ) only |
| Description | Custom text to describe the payment | Optional Alpha-numeric characters only: letters (A-Z, a-z), digits (0-9), and spaces are permitted |
| Currency | The currency to be sent to the beneficiary's account | Mandatory Must be USDT or USDC |
| BeneficiaryType | The type of beneficiary (business or individual) | Mandatory A single character indicating the entity type - ‘B'/’b' (Business) or ‘I'/’i' (individual) only |
| BusinessRegisteredName | The registered name for a business beneficiary | Conditional: Mandatory if BeneficiaryType is B/b (Business) May only contain letters, numbers, spaces, and the following symbols: . / \ - ? : ( ) , + |
| IndividualFirstName | The first name for a beneficiary that is an individual | Conditional: Mandatory if BeneficiaryType is I/i (Individual) May only contain letters, numbers, spaces, and the following symbols: . / \ - ? : ( ) , + |
| IndividualLastName | The last name for a beneficiary that is an individual | Conditional: Mandatory if BeneficiaryType is I/i (Individual) May only contain letters, numbers, spaces, and the following symbols: . / \ - ? : ( ) , + |
| BinanceID | The beneficiary's BinanceId | Conditional: At least one of BinanceID and BinanceEmailAddress must be provided May only contain numbers, minimum 5 digits long, with no letters, spaces, or symbols |
| BinanceEmailAddress | The beneficiary's email address associated with their Binance account | Conditional: At least one of BinanceID and BinanceEmailAddress must be provided Must be a valid email address (e.g. [email protected]) |
| DateOfBirth | The date of birth for a beneficiary that is an individual | Conditional: Mandatory if BeneficiaryType is I/i (Individual) Must be inputted in the format of DD/MM/YYYY |
Errors
Invalid Format: In most cases, the error will notify you of the supported format, so you can edit the payout in your file and reupload. You can also refer to the template guides to check the valid format for each field.
Missing Data: If you have missed a mandatory data field for a payout, you will see an error in the Review page when you click into the flagged payout. You will need to return to your file and add this data before reuploading.
Data is not required for Business/Individual beneficiary: Payouts are flagged if they contain fields that do not match the selected Beneficiary Type. Return to your file to validate whether the Beneficiary Type is correct and ensure the correct information has been added for either a Business or Individual.
FAQs
Why does a payout from a Mass Payout have a failed status?
If the payout is in the Payments Generating tab, and has the Failed status, this means that the payout could not be successfully created in the Orbital system. In this case, please retry the specific failed payout through eCommerce > Payouts > Create a Payout > Single Payout or eCommerce > Payouts > Create a Payout > Mass Payout if you have multiple payouts to make.
If the payout is in the All Payouts tab, it will follow the regular payout statuses.
Why does this field have an error displaying for my input?
Please refer to the relevant section for your template for details on how each field should be formatted. If you are still having issues with your file, please reach out to your Orbital Customer Service Representative.
Why is my Mass Payout not in the approval queue yet?
When you submit a Mass Payout, all individual payouts must be created in the Orbital system in order for the Mass Payout to be approved. There can be some delay between clicking submit on a Mass Payout and it appearing in your approval queue - you can check whether the payments are in the process of being created by visiting the eCommerce > Pay Outs > Payments Generating tab.
Why can I not payout in this currency?
If a crypto PMID is selected, payouts must be in the same currency (including network for USDT/USDC) as that PMID.
If a Binance Pay PMID is selected, payouts must be using Binance Pay (i.e. providing Binance IDs or email addresses for payouts).
If a fiat PMID is selected, payouts can be in any supported cryptocurrency and Orbital will handle the auto-conversion.
Can I cancel my Mass Payout?
Once a Mass Payout file is submitted, the individual payouts are immediately created in the system and processing begins. If you have Approval Rules on, you can reject the relevant payouts in the Approval Queue. However, due to the instantaneous nature of crypto payouts, it is virtually impossible to stop or cancel a transaction once processing has started. Please verify your file carefully before confirming the submission.
Updated 6 months ago